
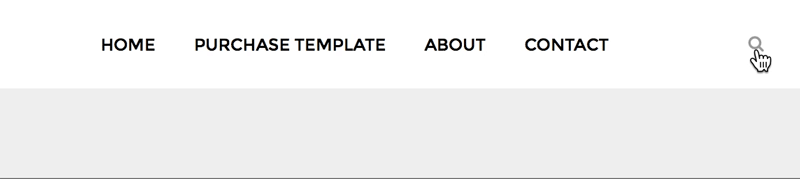
Today’s tutorial is showing you how to add a search icon to your navigation menu that when clicked will display a search box. The search bar will slide down allowing your visitors to search for blog posts (there’s a similar example on this site).
How to create a dropdown search bar in your navigation on Blogger
1. Since we’ll be using a Font Awesome icon in this tutorial, we need to first install Font Awesome using this tutorial.
2. Next, we’ll add the search icon to your navigation menu. Find the custom menu you’ve created, for this tutorial I’ll be using the menu we created in this post with the navigationbar ID (as we’ve added id='navigationbar' to the parent div). If you’re using a different menu, you’ll need to find this parent ID for step 4.
Add the following before the closing </ul> tag in your navigation menu.
<li class="searchicon" id="searchicon"><i class="fa fa-search"></i></li>
3. Within the navigation div but underneath the menu list you’ve created, you’re going to paste the following
<div class='clear' id='searchbar'>
<form expr:action='data:blog.searchUrl' id='searchform' method='get'>
<input id='searchBox' name='q' onblur='if(this.value=='')this.value=this.defaultValue;' onfocus='if(this.value==this.defaultValue)this.value='';' type='text' value='Search...' vinput=''/> <input id='searchButton' type='submit' value='Go'/>
</form>
</div>4. Now let’s add the CSS to style the menu, this is some basic styling but you can customise it to suit your blog. This CSS will go above the closing style tag, which is </b:skin> on Blogger.
/* Start dropdown navigation - XOmisse */
#searchbar {
  display: none;
  margin: 0 auto;
  width: 100%;
  text-align: center;
  height: 50px;
  background: #fff;
  position: absolute;
  overflow: hidden;
  z-index: 9999;
}

#searchicon {
  height: 30px;
  line-height: 30px;
  width: 30px;
  color: #333;
  text-align: center;
  float: right;
  cursor: pointer;
}

#searchicon:hover {
  color: #999999;
}

#searchBox {
-webkit-appearance: none;
border: 0px;
background: #FFF;
padding: 10px;
text-transform: uppercase;
width: 80%;
}

#searchButton {
  width: 10%;
  padding: 10px 20px;
  background: #333333;
  color: #ffffff;
  border: 0;
  outline: none;
  cursor: pointer;
}
/* End dropdown navigation - XOmisse */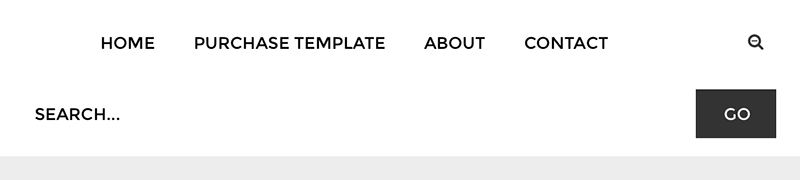
5. Right above the closing body tag </body>, paste the following and save your theme.
<script src="//ajax.googleapis.com/ajax/libs/jquery/2.0.0/jquery.min.js"></script>
<script type='text/javascript'>
$(document).ready(function() {
  var $searchicon = $('#searchicon i');
  var $searchbar  = $('#searchbar');

  $('#navigationbar ul li').on('click', function(e){
    if($(this).attr('id') == 'searchicon') {
      if(!$searchbar.is(":visible")) {
        // if invisible we switch the icon to appear collapsable
        $searchicon.removeClass('fa-search').addClass('fa-search-minus');
      }
        else {
        // if visible we switch the icon to appear as a toggle
        $searchicon.removeClass('fa-search-minus').addClass('fa-search');
      }

      $searchbar.slideToggle(300, function(){
        // callback after search bar animation
      });
    }
  });

  $('#searchform').submit(function(e){
    e.preventDefault(); // stop form submission
  });
});
</script>
Now, when you click the search icon the box should slide down. If it’s not working, double check that there are no errors in your template and no jquery conflicts.